It’s been over two decades since I acquired a black vehicle. The first came in 2002, I remember laying eyes on a gorgeous, black C5 Corvette that was the centerpiece of my local Chevy dealership. A 2000 coupe with just under 12,000 miles, I remember excitedly doing the paperwork and driving it right out of the showroom that night. To this day, I still have the C5 – which has been transformed from a daily driver to a drag car set up for the ¼-mile.
Fast forward to January of this year when an enticing commercial for a 2026 Chevy Colorado got me driving halfway across the Las Vegas valley and sitting before a salesperson at the dealership. Thinking that the deals advertised are never available or achievable when inquiring about them, I was very surprised when the deal was indeed available. Of course, there was a caveat – only three colors were available on the lot. Orange, silver, and black. The plan for the Colorado was two-fold. First, as a longtime professional in the automotive and aftermarket industry, the truck would of course be customized and presented at shows. Second, it would also be used to tow and show with a Viper Red drag boat that I have also custom built over the years. This two-fold plan weighed heavily on the decision of which color to pick. Orange – nope, it would clash! Silver – well, it’s a safe and easy color to maintain, but not quite defining enough for me. So, there it was: a back to a black vehicle for the first time in over 20 years!
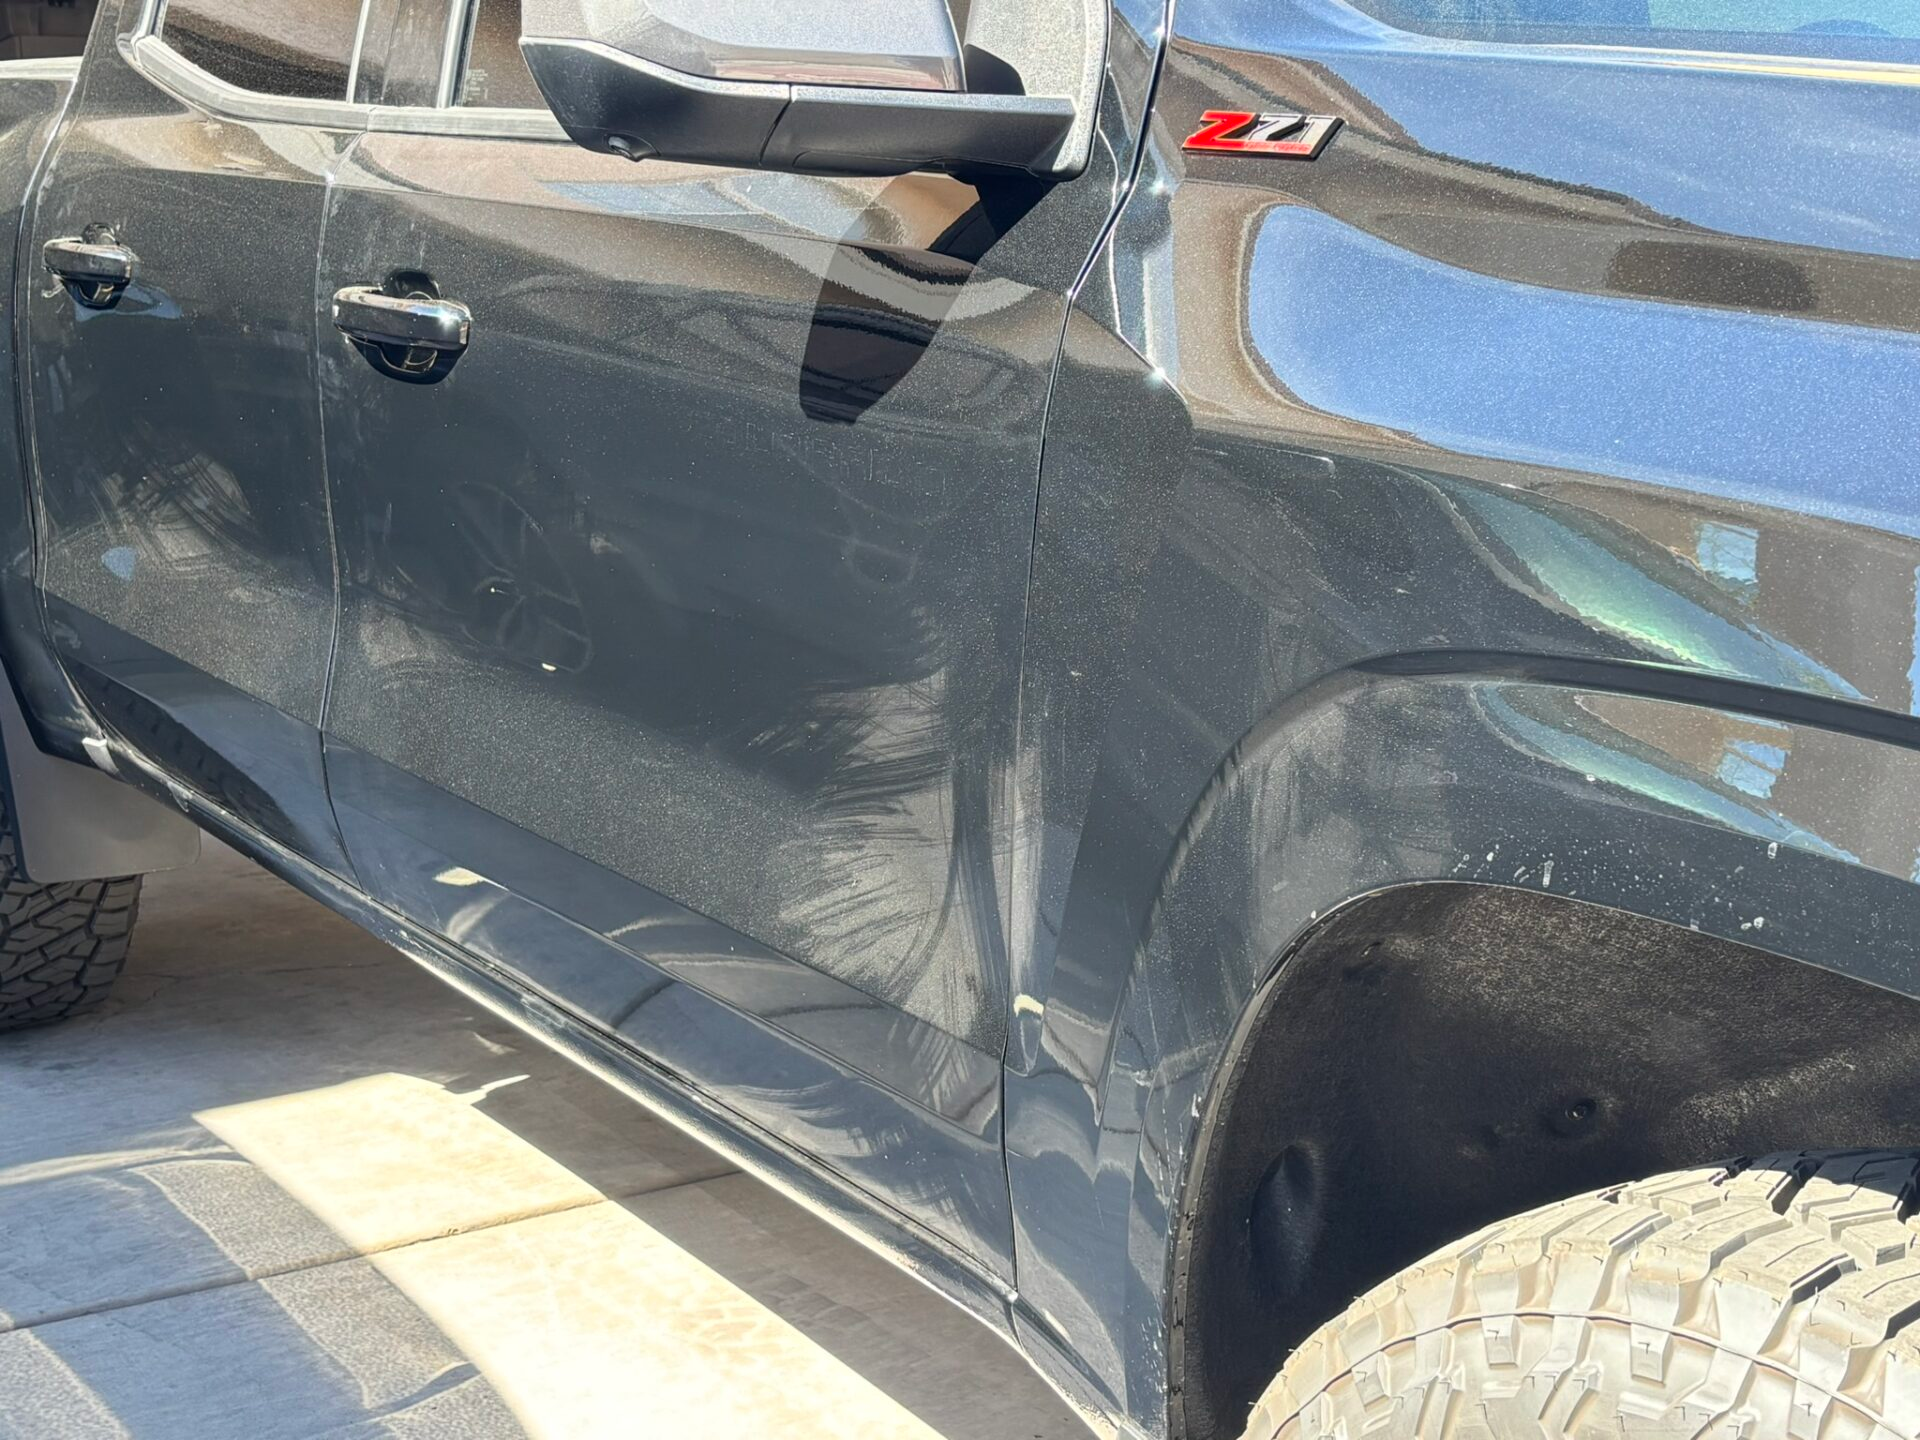
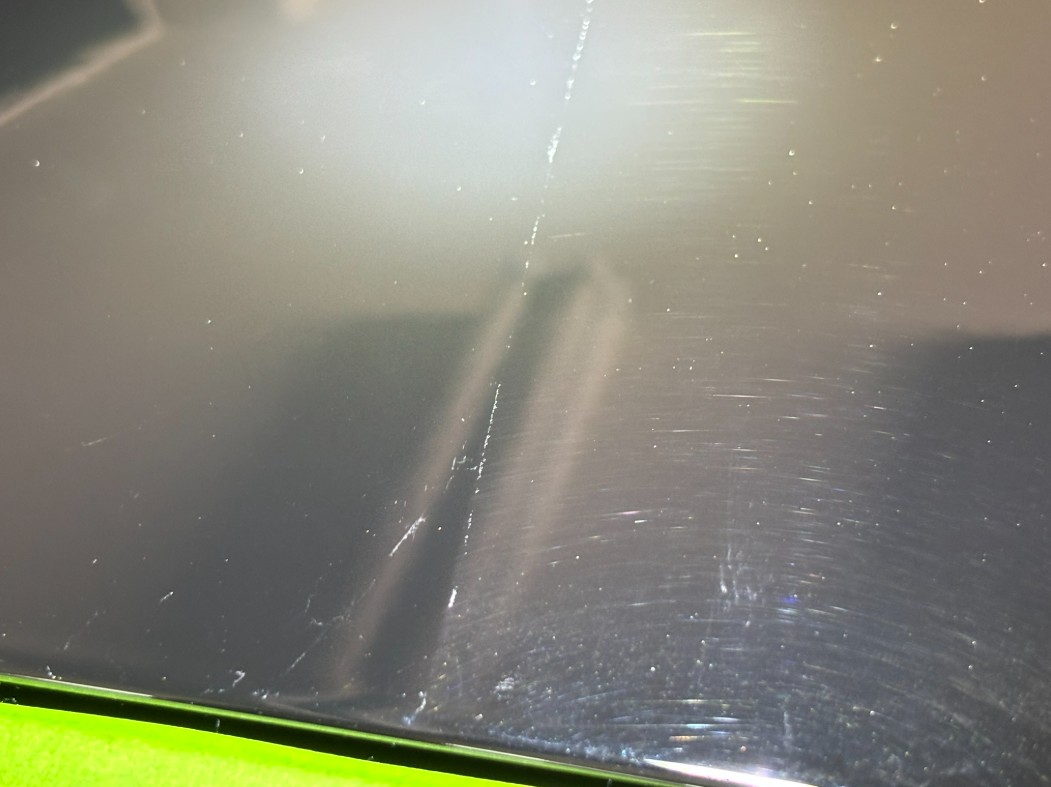
While the Colorado was washed for delivery, my 360 walkaround of the vehicle identified some issues. For one, the hood had a scratch. There were also hard water spots and swirls all over the truck, and it simply didn’t have that glistening, factory-fresh look that we all want in a new vehicle. The dealership noted the flaws and promised a correction and full detailing job before I would take delivery. TWO WEEKS later, I finally get the call, the vehicle is ready. I head back down to the dealership and conduct a second inspection of the truck, which takes place in their multi-level garage. Shielded from direct sunlight, I didn’t notice any big issues, signed off and drove home.
The following morning, I walked out to take a look at the truck. One problem – a huge problem. The truck was now sitting in direct sunlight and every hard water spot and swirl mark was revealed. I was mortified. Immediately I did a hand wash thinking it was just a car wash that endured a slow dry time. After the wash, the water spots were still apparent and abundant. To make matters worse, the window sticker read, and charged for, a dealer-chosen, full-vehicle ceramic coat; but I swear, the water stuck on the paint like glue. There was nothing ceramic about it. I was extremely disappointed.
Getting to Know Griot’s
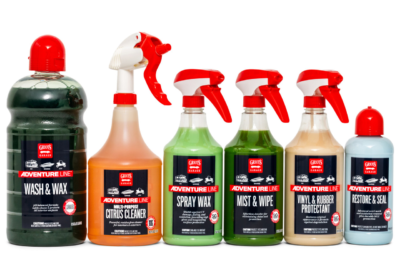
In my garage cabinet are several brands of different polishes and waxes, but in working with correcting the paint on a black vehicle, I wanted to be extra cautious on what I would use. In seeking information with a call to Griot’s Garage, I learned about their multi-step system for paint correction and protection.


In just over a week, my box of Griot’s supplies arrived:
- Surface Prep Mitt Kit, complete with: A Fine Surface Prep Mitt, Speed Shine, Three Edgeless Detailing Towels
- G8 & G9 Orbital 2-Step Ceramic Kit, which contains: A G8 3” Orbital, A G9 6” Orbital, A 25’ cord, Two 6” Orange Foam Correcting Pads, Three 3” Orange Foam Correcting Pads, BOSS Correcting Cream, Ceramic 3-in-1 Wax
- Plenty of Microfiber Plush Edgeless Towels
I also worked with an expert at Griot’s, Stevie Heidemann. She came out of the gates with meticulous directions and details for my multi-step process. To be honest, I was intimidated, but at the same time, grateful for Stevie’s guidance in setting me up for success.
The Heat is On
This May in Las Vegas, the valley had endured some heat spikes earlier than usual. On top of that, the wind came barreling through in between the temperature surges. Staring at the Colorado, the water imprints were getting even more baked into the paint while the swirls felt more magnified as the days passed. It was imperative that I got to work cleaning up the mess. But, with the weather the way it was, it was crucial that I detail in shelter.
I had two places where I could complete the detailing project in a climate-controlled condition that was out of direct sunlight. The first was at my office at the Las Vegas Motor Speedway. With a big bay door, I could place the truck completely inside for as long as I needed. However, the Speedway office is kept cool by a large rooftop swamp cooler which has been known to blow out sediment, thanks to our dusty desert conditions. The second place was my home’s two-car garage which is kept at a cool 70-degrees by way of an air conditioner. However, due to a tub sink at the head of the garage, the Colorado is a few inches too long to fit in the garage. I elected to use my home garage, but had a plan to detail half the truck at a time, starting with the truck bed to complete the tailgate and rear fenders first.
Keep Calm and Detail On
Living in the desert, dust is everywhere in an instant. Even if you’ve wiped or washed something five minutes ago, you can count on the pesky dust particles to instantly be attracted to any clean surface. I knew the multi-step process would take hours, especially as I was working with new products and tools. Having already handwashed the Colorado, I wiped down each panel prior to working on it to remove as much particulate matter as possible.
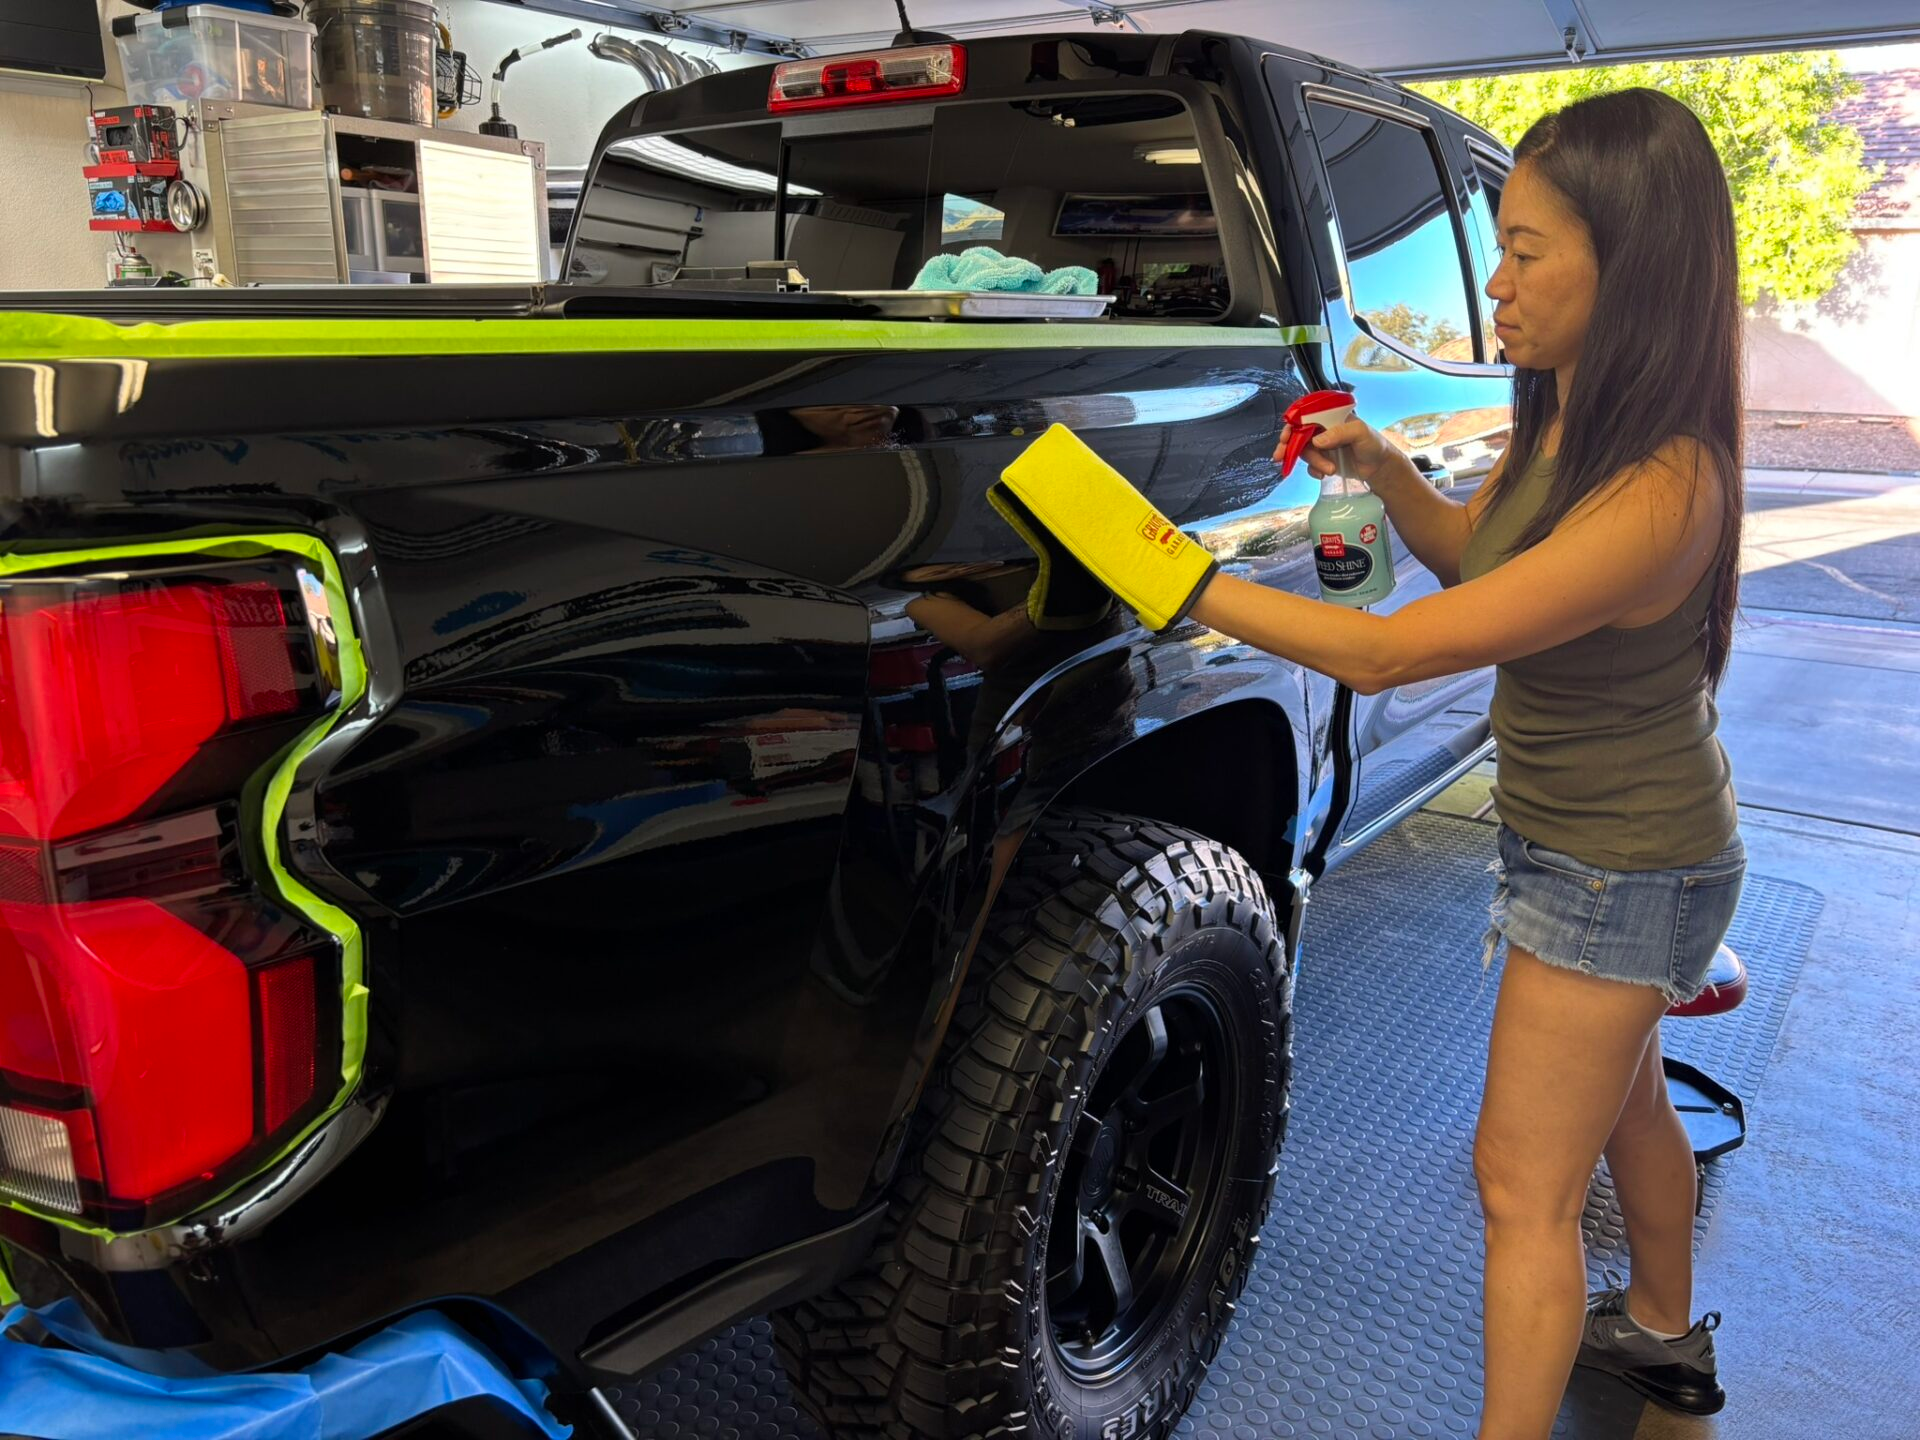
The Surface Prep Kit comes with the Fine Surface Prep Mitt, which acts like a clay bar, but is infinitely easier to use. The Mitt, with a bottle of Speed Shine detailing spray, goes a long, long way in loosening and removing surface contaminants, pollen, smudges, light grime, impurities and overspray. Another benefit, while I have used clay bars, the Prep Mitt is said to outlast clay 10-to-1. This step is relatively quick. A few sprays in small sections accompanied by light pressure and overlapping passes with the Prep Mitt, and you’re good to go with a microfiber wipe down of any excess spray. Recommended: Griot’s PFM Edgeless Detailing Microfiber Towels to buff the surface after using the Mitt. This step alone leaves the surface stunningly clean, hyper smooth to the touch and gives the user the encouragement that things are going very well, building confidence.
The Art of Paint Correction
When I say art, I mean it’s an art! I have friends who own detailing businesses and I have certainly watched my fair share of shows and videos on it. While buffers are usually the norm, I’ve always completed my detailing jobs by hand. This was my first time working with an orbital tool. If not for Griot’s and their team’s willingness to guide me on this project, I would have shied from any orbital tool. What I’m here to say now is don’t be scared! There’s a learning curve, but I found myself learning, doing, adjusting, learning more and continuing to get better at the process. Halfway through, I had a new sense of confidence, and I learned a new way to do something.
As an investment, I can see why one may tinker between the decision of getting either just the G8 or the G9. However, after using both orbital tools, it’s easy to see that each has a distinctive purpose. At first, you might think that the G9 and its 6” buffer pad would just be faster. Then you think the G8 with its 3” pads would be perfect for the A-pillars and such. Logical. As I learned, the type of vehicle you’re working on greatly dictates which tool will be used more often. The curves and contours of the Colorado’s body panels made a first-timers journey that much harder and longer. Every panel from the hood to the tailgate has multiple bulges and sharp body lines. This landscaped truck quickly showed why Griot’s has a bundle set called the G8 & G9 Orbital 2-Step Ceramic Kit – because cars often challenge us with sculpted bodies made up of large and small sections requiring large and small buffers, even beyond the A-pillars.
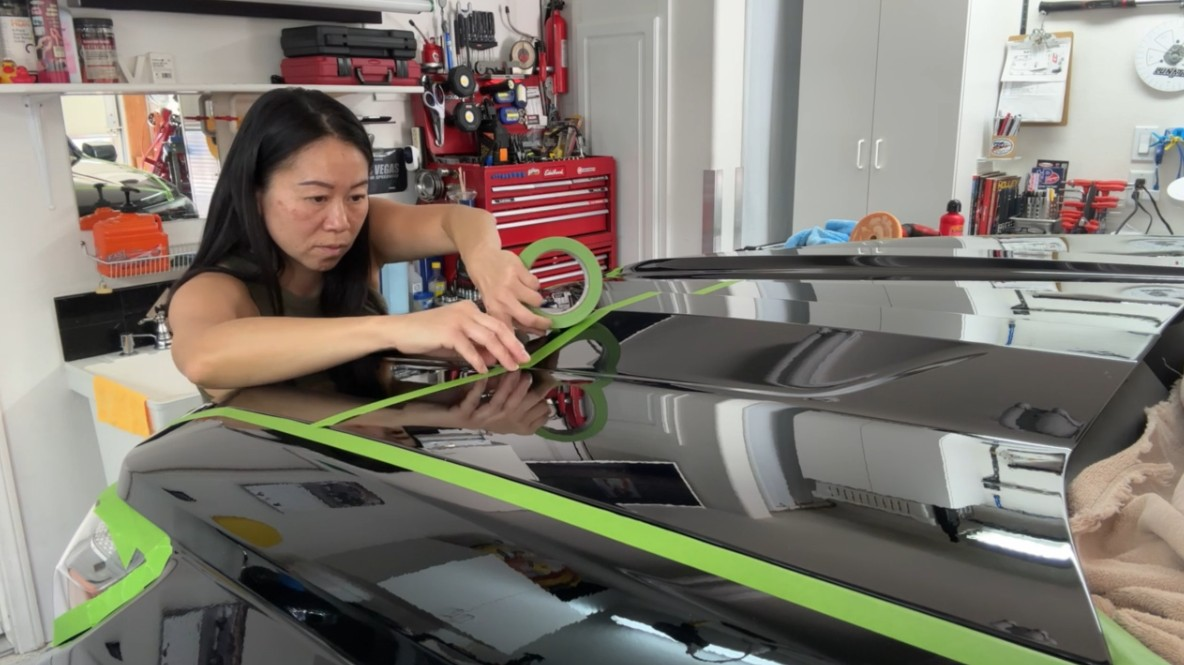
Starting with the tailgate, I carefully taped off all the plastics and moldings with FrogTape’s multi-surface green masking tape due to its less aggressive adhesion. I used the G9, carefully affixing the buffer to the plate, plugged in the 25’ power cord (yes – no extension cords needed!), placed the cord over my shoulder, and carefully placed BOSS Correcting Cream in a circular pattern on the pad. The G9 offers variable speeds, and I started with 3. I must not have been super careful because I slung BOSS Correcting Cream everywhere! Mortified, I put the tool down and began to wipe off all the places that shouldn’t have BOSS Cream. Attempt two. I placed the pad onto the tailgate and hit the trigger with my finger while pressing the locking tab so that it remains at the selected speed. After spreading the cream on a 2’ x 2’ section, I released the trigger as I lifted the pad off the tailgate. But, as the buffer was still spinning, BOSS Correcting Cream was once again slung everywhere! It’s a learning curve, right? The lesson learned here was to make sure the pad was in contact with the surface before pulling the trigger and after the machine had stopped spinning.
A little more confident, I turned up the orbital speed to 5 for paint correcting. Speed 5 was a beast to me as I wasn’t yet used to handling the tool. The tool has some weight to it, plus the torque, you’ve really got to brace yourself a bit. A forward-placed handle on the tool allows more stability, but even so – it’s a learning curve. Carefully making several crosshatch passes, I remembered this time to release the trigger and wait for the pad to completely stop before removing it from the surface.
After finishing the tailgate, I was not sure the G9 was able to provide adequate coverage. The grooves and contours of the tailgate likely caused me to miss several spots with the 6” buffer, which seemed huge on the tailgate. I decided to bring out the G8 and use the smaller, more precision-oriented 3” pad to, in essence, redo the entire tailgate. After my first experience with the weight of the G9 and how large the 6” buffer pad felt, I instantly had more control with the G8. I was able to tackle the different contours of the tailgate and finish this panel with excellent coverage.
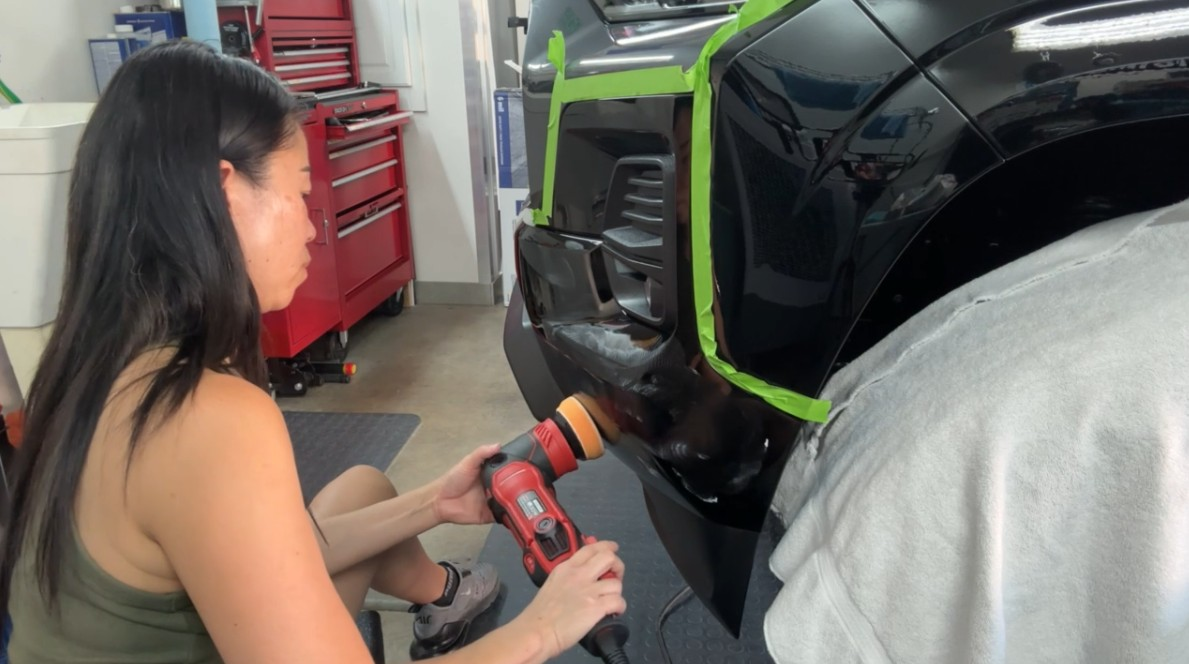
The next panel I tackled was a rear fender. I chose to use the G8 only, given all of the concours it had. When buffing, it’s so important to pay close attention to ensure that the buffer pad is as flat as possible on the body panel and making good contact. It’s truly a fine balance, an art. What I found was that the buffer would start to pull or try to guide me in another direction once it was going into grooves and curves. Also, again, cream starts to sling when you don’t have good contact. During this time, you’re also learning about the nuances of how much pressure to apply. You want to allow the buffer, pad and cream to do the work without too much pressure.
After two panels were done during my first session, it was time for a break. I watched a few more videos on both the Griot’s site and other detailers on YouTube to see if I could pick up a few more tips. I learned about “dabbing” the cream on the body panel before spreading it with the buffer. This technique helped as it controlled any slinging of the cream. I decided to reduce the speeds of each step by one. To spread the BOSS Correcting Cream, I elected to use speed 2. When making passes across the panel to correct the finish, I elected to use speed 4. The reduced speeds gave me a better sense of control, especially given the challenges of the Colorado body lines. For over 80% of the truck, I used the G8. For a portion of the doors, I was able to use the G9, and it was very useful for the roof.
After the paint correction was done on the entire Colorado (12+ hours later for this newbie!), it was time to finish with the Ceramic 3-in-1 Wax. First, this stuff smells great! I absolutely love it. Using two new fresh Griot’s Plush Microfiber Towels, I used one to spread the ceramic wax and initial buff while using the second, drier, microfiber towel for a final buff. The application is straightforward and easy. What’s great is that the 3-in-1 Wax can be used on plastics, molding, glass, and chrome. Therefore, all the tape that protected the plastics and moldings from the cream can be taken off during this final step.
Lessons Learned
- Don’t be intimidated. I used to hear the stories of “burning the paint” and when it came to the use of tools for detailing, I always shied away from it. Today’s technology in tools and product composition gives opportunities to DIY-ers like me. The brands want to equip DIY-ers with tools that we can learn to use well and provide entire lines of product to safeguard us. The web is both a blessing and a curse. There’s an abundance of information and resources out there – some good, some OK, some incorrect. You have to do your research and it starts with the manufacturer of the tools and products. On the Griot’s website, you’ll find many Q&A’s, FAQs, and videos.
- Trust the process and yourself. I read the directions personally provided by Stevie at Griot’s many times and even watched several Griot’s-produced and third-party produced videos before starting on my truck. No matter how much I studied the material, nothing was going to teach me more than “on the job.” I didn’t know what questions or challenges I would have until I encountered them. I printed out directions and had them on my tool tray at first which was great for referencing at every step, but that’s also why I did the tail gate and first rear fender panel in two hours. I was starting, pausing, starting, doing the panel over again, etc. Over time, I started to develop my own adaptation to the initial “how to” step-by-step guides given my learning curve and the truck’s bodylines. Within a couple hours, I was getting used to the speeds and power, weight and handling of the orbitals. More importantly, I was handling the tools and buffing with confidence. This made all the difference in the results.
- Be one with buffing. You have to go with the flow of the vehicle’s body lines. The buffer pad needs to make as much full contact with the panel as possible. Sometimes you think you’re going to do a bigger section, let’s say a 2’ x 2’ section. However, the bodylines could tell you otherwise. Don’t fight it – if you thought you were going to do a bigger area but it’s not going your way, just do the area that provides the smoothest crosshatch pattern so your pad doesn’t sling cream and doesn’t get off-balance.
- Exercise patience, take your time. I spent about 12 hours on this project. What seemed daunting at first due to my slow progress eventually picked up. However, don’t shortcut the task. By properly taping off the molding and plastic and covering your tires, you won’t be cleaning cream off them later – trust me, it’s worth it! Also, thinking of these masking topics, for convertible tops, it’s a great idea to use the large microfiber towels. Do manageable sections, don’t be hasty and do an entire panel because it won’t be consistent. If you cannot finish in the same day, it’s OK. Take a break, clean your pads and resume later.
- There’s a right way to wash microfiber towels. I learned that I had been washing microfiber towels entirely wrong. There’s actually a product to help release waxes and chemicals – Griot’s Microfiber & Foam Pad Cleaner. You will need a washer detergent that is free and clear of dyes as you add 2 to 4 ounces of the Griot’s cleaner into the washer. Also be sure to look up which types of waxes or chemicals can be washed at the same time. Some towels that have been used with certain chemicals need to be kept separate from towels that contain other chemicals. Kind of like washing a terrycloth with a microfiber, it’s just not a good idea.
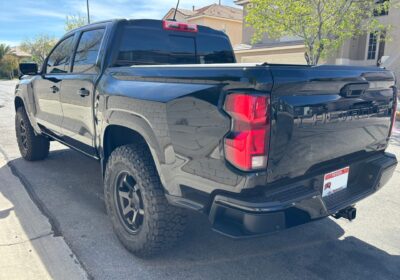
It’s Finally Back to Black!
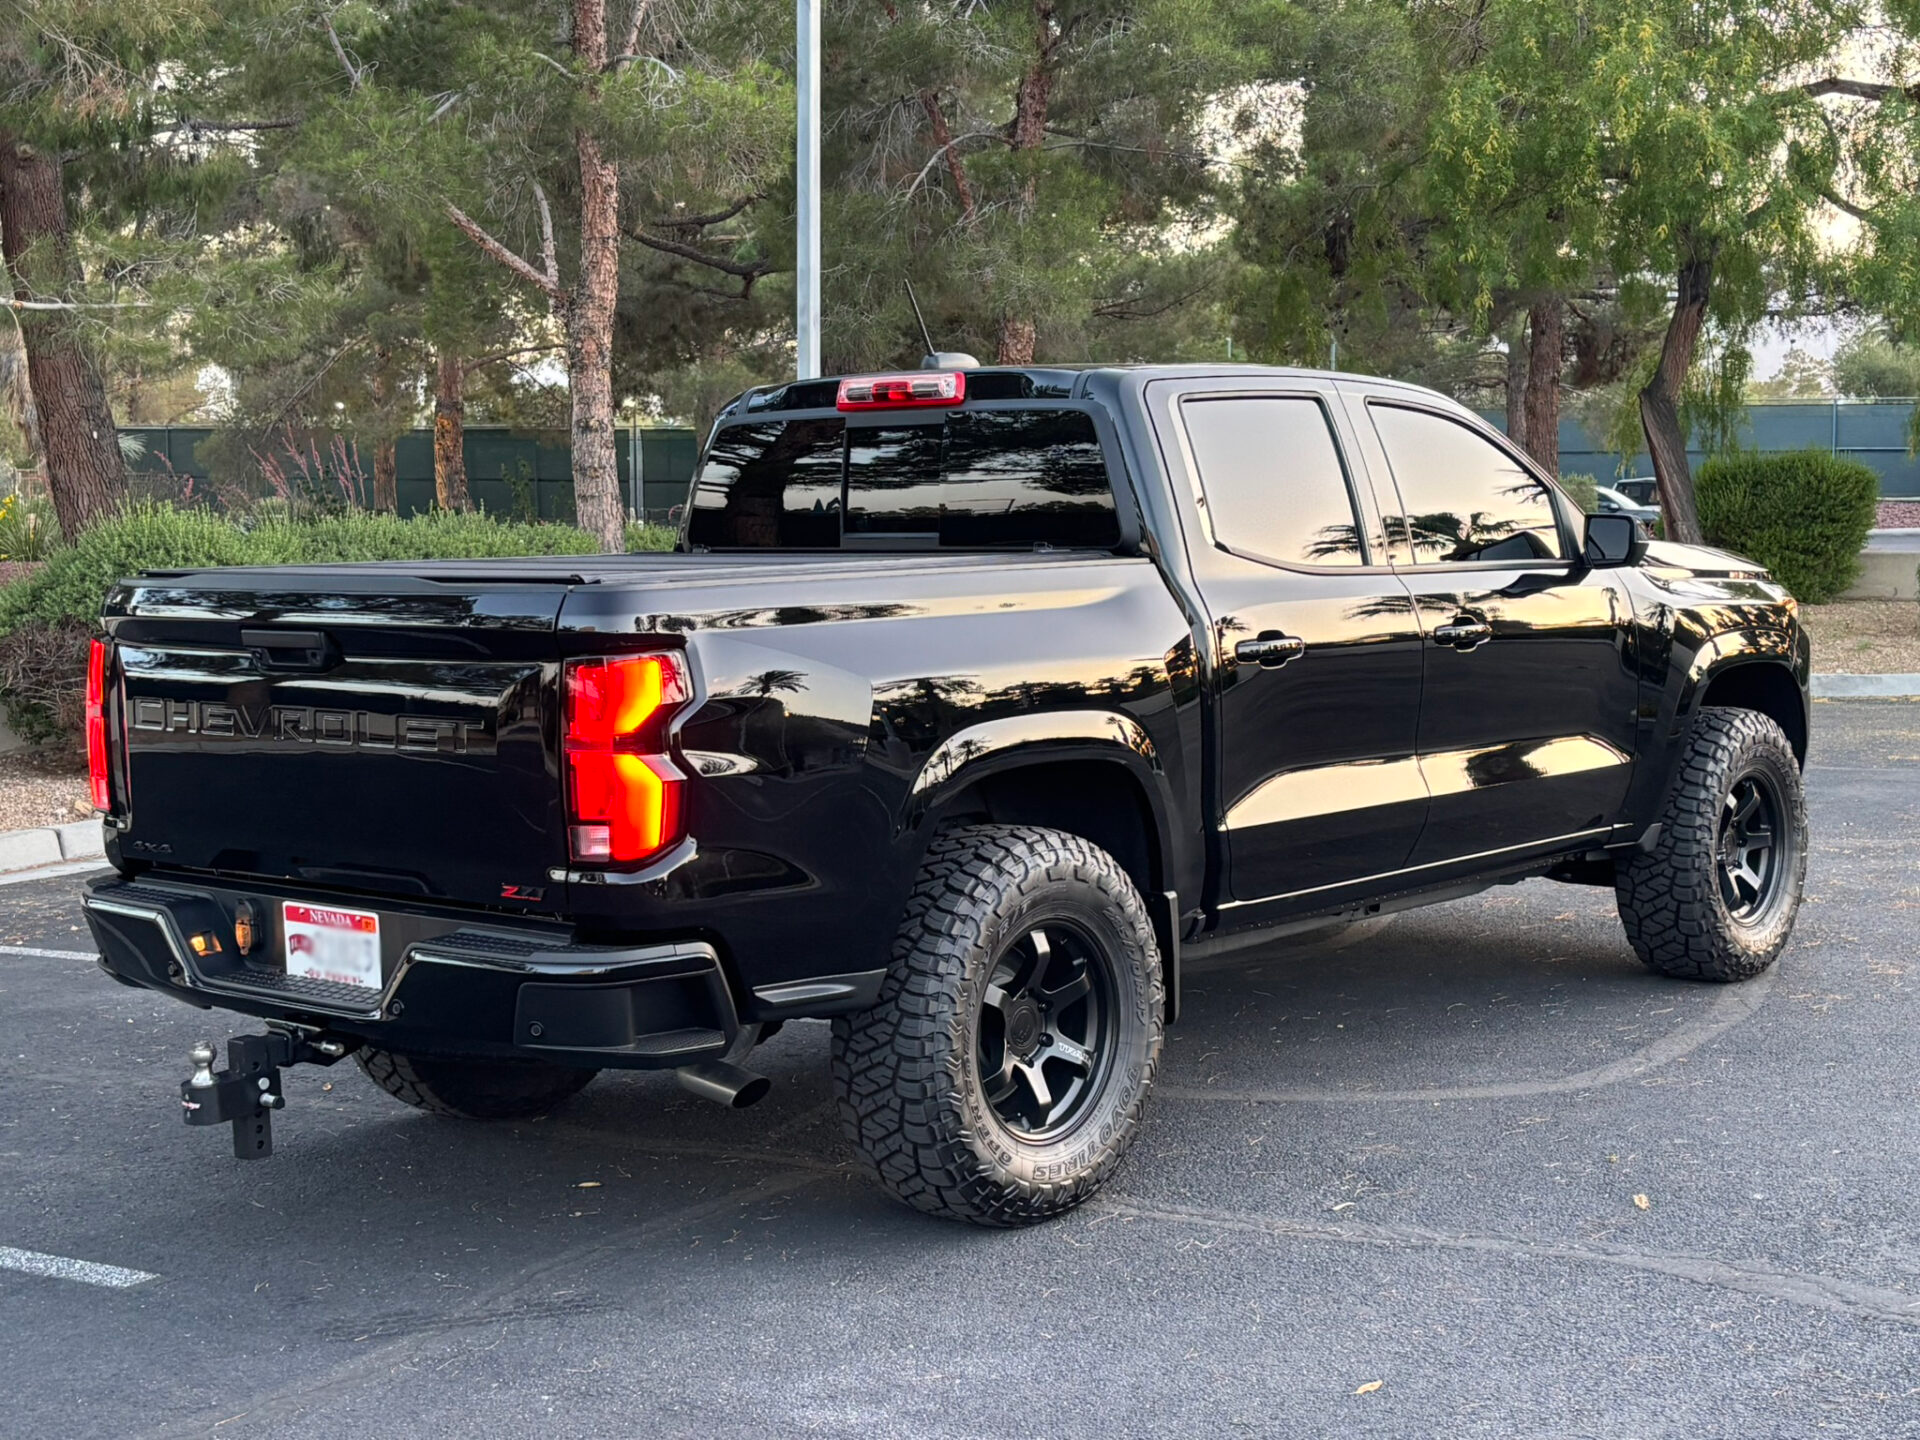
The result of this multi-step detailing process? The Colorado’s color now has depth and gloss. It’s beautiful! Shining a light on the body, I can see that the hard water spots and swirls have disappeared. I also de-badged the Colorado letters from the tailgate and front doors which left some imprints and those are now gone. This is the type of delivery I should have gotten from the dealership, but at the same time I’m incredibly proud of myself for doing this project and learning to use different tools, polishes, and chemicals. You see, I’m used to building engines, but detailing was “another beast” in my eyes. I’m grateful to have embarked on this journey!